Blog search
The default Jekyll theme (minima) is perfect for writing a blog. Let’s see how to edit this theme to allow searching into all the posts.
This tutorial will be focused on the front-end part, and assumes that you already have pushed all your data, following our getting started guide.
What we’ll build
In this tutorial we’ll add a search on the front page that will let you search into all your posts (both titles and content), in a fast and relevant manner.
Extending the theme
Because the minima is pre-packaged as a dependency, if you want to edit it,
you need to overwrite some of its files locally. For this tutorial, we’ll
need to update one file from the original theme.
---
layout: default
---

<div class="home">

  {{ content }}

  <h1 class="page-heading">Posts</h1>

  <div id="search-searchbar"></div>

  <div class="post-list" id="search-hits">
    {% for post in site.posts %}
      <div class="post-item">
        {% assign date_format = site.minima.date_format | default: "%b %-d, %Y" %}
        <span class="post-meta">{{ post.date | date: date_format }}</span>

        <h2>
          <a class="post-link" href="{{ post.url | relative_url }}">
            {{ post.title | escape }}
          </a>
        </h2>

        <div class="post-snippet">{{ post.excerpt }}</div>
      </div>
    {% endfor %}
  </div>

  {% include algolia.html %}

  <p class="rss-subscribe">subscribe <a href="{{ '/feed.xml' | relative_url }}">via RSS</a></p>

</div>
This file should be saved to _layouts/home.html in your own Jekyll directory.
You might have to create the _layouts folder if it does not yet exist.
Adding front-end code
We’ll now create the _includes/algolia.html file that we included in the
previous code. You’ll have to create the _includes directory if it does not
exist yet.
In that file, we’ll add the following content. It’s a lot of code in one go, but don’t worry, we’ll explain it all right after.
Note that for the sake of readability we will be using JavaScript features that might not be available in all browsers (namely const, template literals and arrow functions). If you need compatibility with browsers that do not ship those features, we recommend you use Babel to automatically transpile your code.
<!-- Including InstantSearch.js library and styling -->
<script src="https://cdn.jsdelivr.net/npm/instantsearch.js@2.6.0/dist/instantsearch.min.js"></script>
<link rel="stylesheet" type="text/css" href="https://cdn.jsdelivr.net/npm/instantsearch.js@2.6.0/dist/instantsearch.min.css">
<link rel="stylesheet" type="text/css" href="https://cdn.jsdelivr.net/npm/instantsearch.js@2.6.0/dist/instantsearch-theme-algolia.min.css">

<script>
// Instanciating InstantSearch.js with Algolia credentials
const search = instantsearch({
  appId: '{{ site.algolia.application_id }}',
  indexName: '{{ site.algolia.index_name }}',
  apiKey: '{{ site.algolia.search_only_api_key }}'
});

// Adding searchbar and results widgets
search.addWidget(
  instantsearch.widgets.searchBox({
    container: '#search-searchbar',
    placeholder: 'Search into posts...',
    poweredBy: true // This is required if you're on the free Community plan
  })
);
search.addWidget(
  instantsearch.widgets.hits({
    container: '#search-hits'
  })
);

// Starting the search
search.start();
</script>
Including the InstantSearch.js library
The first lines will include the InstantSearch.js library as well as minimal styling, directly from the jsDeliver CDN. Those files are also available through Yarn/NPM if you need them locally.
Instanciating the library
Then we instanciate instantsearch with our Algolia credentials. We use the {{ }} notation here to include variables that are defined in your _config.yml
file.
Both application_id and index_name should already be in your _config.yml
file. The search_only_api_key should be new, though.
Add a new entry in your _config.yml file, under the algolia namespace with
the value of your Search API Key (you can find it in your Dashboard):
# _config.yml algolia application_idYOUR_APPLICATION_ID index_nameYOUR_INDEX_NAME search_only_api_keyYOUR_SEARCH_ONLY_API_KEY
Adding widgets
InstantSearch.js lets you build your search UI through widgets. Each part of the UI is a specific widget, and all widgets are kept in sync at all time.
For this example we’ll need two widgets: a searchbar, and a list of results. The
mandatory configuration for each widget is the container option. It defines where
in the page the widget should be placed.
The searchbar will be added inside the #search-searchbar empty <div>. The
results will be added inside #search-hits. This <div> already contains the
static list of posts Jekyll added, but it’s not an issue. When the page will
load, the static list from Jekyll will be displayed, but as soon as
InstantSearch loads, it will replace the list with its own results.
What it looks like for now
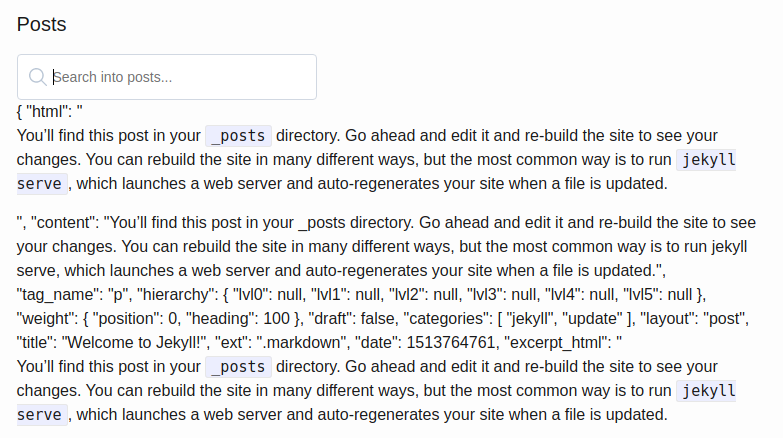
This is what it should look like at this stage. We have a search bar, but results are displayed in a raw JSON format. Let’s work on styling this.

Templating
We’ll add some templating to the result, so they look like regular posts. We use
the templates.item key of the widget for that. It accepts a function that will
take the matching hit (the result) as input, and should return an HTML string.
We’ll re-use a similar markup than the one used in the original Liquid template.
search.addWidget(
  instantsearch.widgets.hits({
    container: '#search-hits',
    templates: {
      item: function(hit) {
        return `
          <div class="post-item">
            <span class="post-meta">${hit.date}</span>
            <h2><a class="post-link" href="{{ site.baseurl }}${hit.url}">${hit.title}</a></h2>
            <div class="post-snippet">${hit.html}</div>
          </div>
        `;
      }
    }
  })
);

This looks much better already. By using a template, we managed to make the result look close to what the initial display was. In the next section, we’ll fix the styling and formatting.
Styling
Formatting the date
One of the first issues you can notice is that the date is not formatted. By default we display it exactly as it was saved in the Algolia index: as a UNIX timestamp.
Because our template is a JavaScript function, we can reformat data before rendering it. Here we will use the moment.js library to format our date.
Using moment.unix(hit.date).format('MMM D, YYYY'); we’ll transform
1513764761 into Dec 20, 2017.
Note that, contrary to posts, pages don’t have a date defined, so we don’t display this field if that’s the case.
Adding highlighting
To make the display even easier to understand, we should add some highlighting: words typed in the search bar should be highlighted in the results.
Results returned by the Algolia API are enriched with a _highlightResult key
that contain information about the highlighting.
Adding highlighting is as easy as using {{hit._highlightResult.title.value}}
instead of {{title}}.
Adding CSS
We’re almost done, but we still have some minor styling adjustment to make. We want the search bar to take the whole width, and we also want to add some spacing between the results. We’ll also change the color of the highlighted words so they are easier to spot.
All HTML nodes added by InstantSearch.js come with a custom .ais-* class added
to them. This makes altering the styling of the elements to match your overall
theme easy to achieve.
Headings
With the current configuration, we will sometimes end up with results that look irrelevant: nothing is highlighted neither in the title or the content.
This is because by default the plugin is searching not only in the content and
the title, but also in the headings (<h1> to <h6> of the page). Because we
currently only display the title and content, it make some perfectly relevant
result look odd, because nothing is highlighted.
To fix that, we’ll add the highlighted headings to the display when they are
matching. We’ll create a new variable called breadcrumbs, filled with the
highlighted headings, and add it to our template only when not empty.
We also update the url to include the # anchor that will point the link
directly to the closest matching heading.
Final code
Here is the complete new version of the _includes/algolia.html file.
<script src="https://cdn.jsdelivr.net/npm/instantsearch.js@2.6.0/dist/instantsearch.min.js"></script>
<script src="https://cdnjs.cloudflare.com/ajax/libs/moment.js/2.20.1/moment.min.js"></script>
<link rel="stylesheet" type="text/css" href="https://cdn.jsdelivr.net/npm/instantsearch.js@2.6.0/dist/instantsearch.min.css">
<link rel="stylesheet" type="text/css" href="https://cdn.jsdelivr.net/npm/instantsearch.js@2.6.0/dist/instantsearch-theme-algolia.min.css">

<script>
const search = instantsearch({
  appId: '{{ site.algolia.application_id }}',
  apiKey: '{{ site.algolia.search_only_api_key }}',
  indexName: '{{ site.algolia.index_name }}'
});

const hitTemplate = function(hit) {
  let date = '';
  if (hit.date) {
    date = moment.unix(hit.date).format('MMM D, YYYY');
  }

  let url = `{{ site.baseurl }}${hit.url}#${hit.anchor}`;

  const title = hit._highlightResult.title.value;

  let breadcrumbs = '';
  if (hit._highlightResult.headings) {
    breadcrumbs = hit._highlightResult.headings.map(match => {
      return `<span class="post-breadcrumb">${match.value}</span>`
    }).join(' > ')
  }

  const content = hit._highlightResult.html.value;

  return `
    <div class="post-item">
      <span class="post-meta">${date}</span>
      <h2><a class="post-link" href="${url}">${title}</a></h2>
      {{#breadcrumbs}}<a href="${url}" class="post-breadcrumbs">${breadcrumbs}</a>{{/breadcrumbs}}
      <div class="post-snippet">${content}</div>
    </div>
  `;
}


search.addWidget(
  instantsearch.widgets.searchBox({
    container: '#search-searchbar',
    placeholder: 'Search into posts...',
    poweredBy: true // This is required if you're on the free Community plan
  })
);

search.addWidget(
  instantsearch.widgets.hits({
    container: '#search-hits',
    templates: {
      item: hitTemplate
    }
  })
);

search.start();
</script>

<style>
.ais-search-box {
  max-width: 100%;
  margin-bottom: 15px;
}
.post-item {
  margin-bottom: 30px;
}
.post-link .ais-Highlight {
  color: #111;
  font-style: normal;
  text-decoration: underline;
}
.post-breadcrumbs {
  color: #424242;
  display: block;
}
.post-breadcrumb {
  font-size: 18px;
  color: #424242;
}
.post-breadcrumb .ais-Highlight {
  font-weight: bold;
  font-style: normal;
}
.post-snippet .ais-Highlight {
  color: #2a7ae2;
  font-style: normal;
  font-weight: bold;
}
.post-snippet img {
  display: none;
}
</style>
Final result
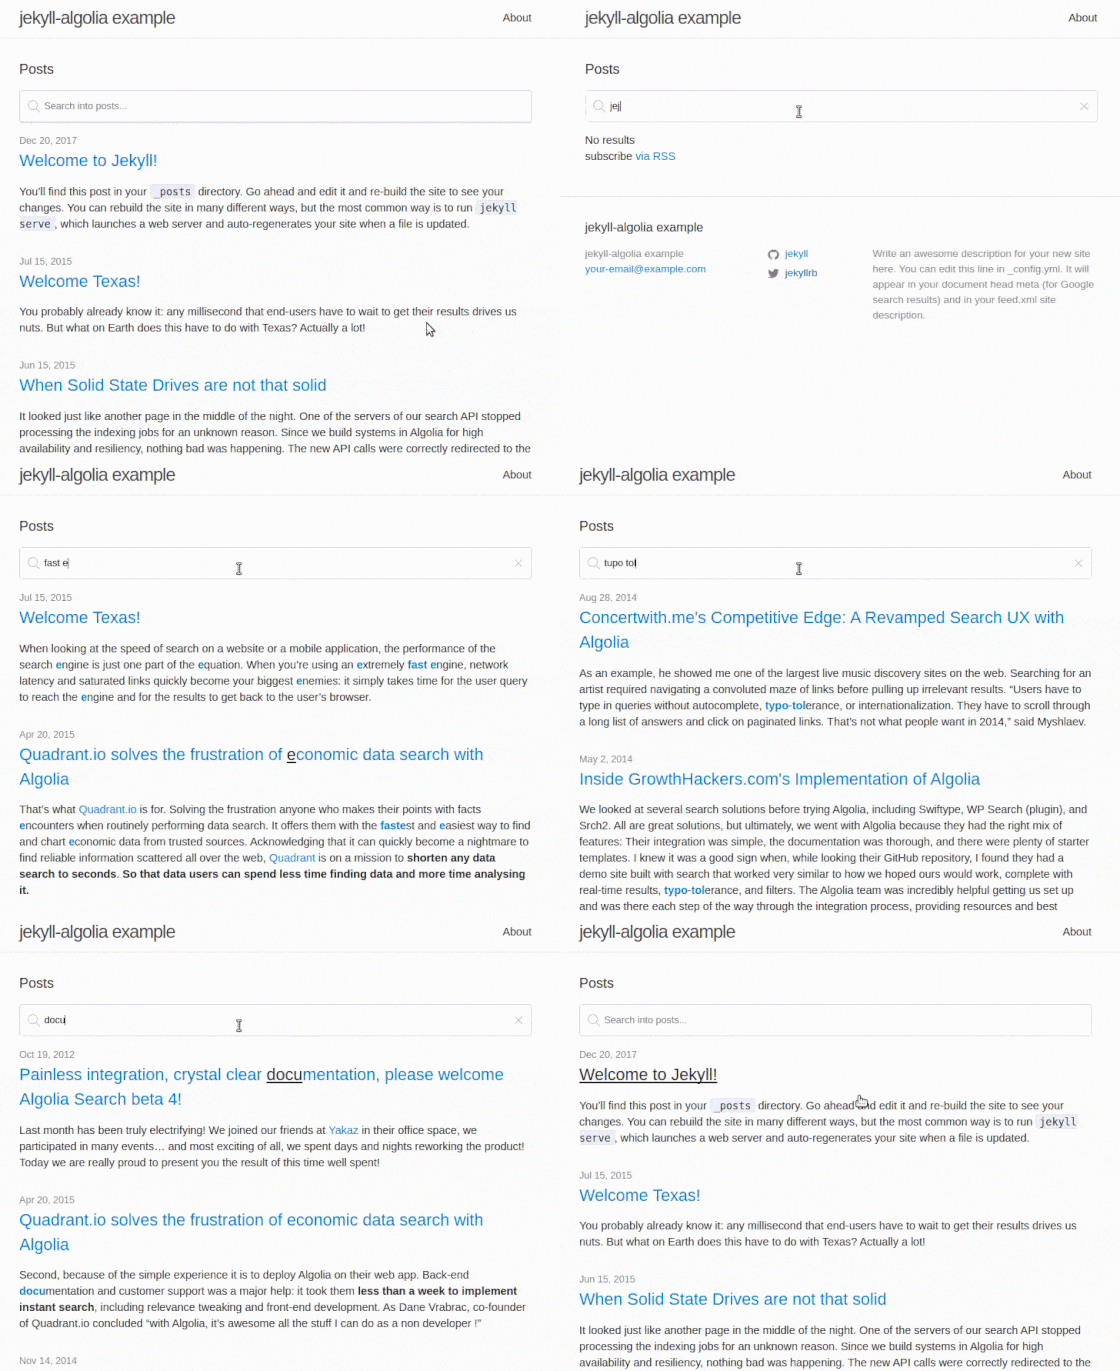
You can check the final result live here, and have a look at all the code from the GitHub repository.
